Sunday, May 25, 2025

Class 6 NCERT bridge course Answers Activity W3.6 Deriving Area Formulae

 Deriving formula of Area of Square, rectangle

 The children are familiar with the shapes, squares and rectangles. 

 The following activities may be performed to give them an idea of the formulae of the area of squares and rectangles. 

Activity W3.6 

Figure (a) (b) (c) 

 Give children such square and rectangular shapes made on grids. 

 Ask them to count the number of squares horizontally and vertically. 

 This will give them an idea of how long and wide the shape is. 

 The information can be filled in the table given below. 


πŸ“πŸ“ Part 2: Deriving the Area Formula for Squares & Rectangles

Objective:

To help students derive rather than memorize the formula for area of a square and rectangle.

Materials Needed:

  • Square and rectangular cut-outs (using graph paper helps)

  • Ruler

  • Pencil

Activity Steps:

Rectangle Area

Figure (a)
  1. Take a rectangle of length 5 units and breadth 4 units.

  2. Divide it into 1 × 1 unit squares.

  3. Count the total number of small squares.

  4. Students will find:
    Area = Length × Breadth = 5 × 4 = 20 square units

Figure (b)
  1. Take a rectangle of length 6 units and breadth 5 units.

  2. Divide it into 1 × 1 unit squares.

  3. Count the total number of small squares.

  4. Students will find:
    Area = Length × Breadth = 6 × 5 = 30 square units

Square Area Figure (c)

  1. Take a square with each side 5 units.

  2. Divide and count the 1 × 1 squares inside.

  3. Students will observe:
    Area = Side × Side = 5 × 5 = 25 square units


Conclusion:

  • Rectangle → Area = Length × Breadth

  • Square → Area = Side²


Wednesday, May 21, 2025

Class 6 NCERT bridge course Answers Activity W3.5 Exploring Symmetry in Design

 Activity W3.5 Exploring Symmetry in Design  

 Divide students into groups and provide them with coloured pencils or markers 

along with blank sheets of paper.

Asks each group to create a design that exhibits rotational symmetry. 

 Encourage them to experiment with different shapes and colours to make their designs more beautiful.

 Discussion 

 Lead a discussion on the importance of symmetry in art, architecture, and nature. 

 Encourage students to share examples of symmetrical patterns they have noticed in their surroundings.

 Explore 

 Take a nature walk around the school or nearby park and ask students to identify objects with rotational and reflection symmetry. 

 Organize a field trip to a museum or art gallery to observe symmetrical patterns in different forms of artwork. 


 Provide students with symmetry-themed puzzles and games to solve collaboratively, fostering teamwork and critical thinking skills. 

Symmetry is not only a fundamental concept in mathematics but also a source of inspiration for artistic expression. 

By exploring rotational and reflection symmetry, students can sharpen their observational skills, enhance their creativity, and develop a deeper appreciation for the beauty of symmetry in the world around them. 

So, let's continue to embrace symmetry as we embark on our journey of discovery and creativity!


Activity W3.5: Exploring Symmetry in Design 

 Creating Designs with Rotational Symmetry

Objective:

To understand rotational symmetry through hands-on design activity and connect symmetry to real-world patterns in art, nature, and architecture.

Activity Instructions:

  1. Group Work: Divide the students into small groups.

  2. Materials: Give each group blank paper, colored pencils, compass, and rulers.

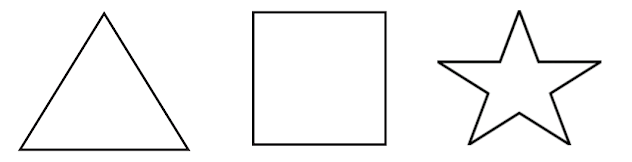
  3. Task: Ask them to create original designs using basic shapes like circles, triangles, squares, or petals that show rotational symmetry.

  4. Rotate and Repeat: Let them repeat the pattern around a central point (e.g., 60°, 90°, 120° rotations).

Examples:

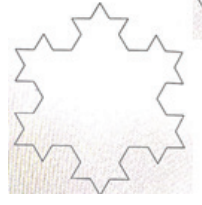
  • Mandala Design using repeated triangle or petal shapes.

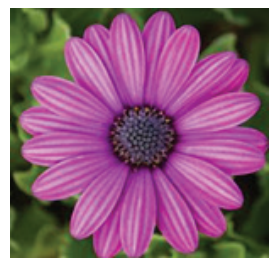
  • Flower pattern with 6 petals (rotational symmetry at 60°).

  • Star designs repeated around a center point.

Free-to-Use Image Suggestions:

Discussion:

  • Where do we see symmetry in life?
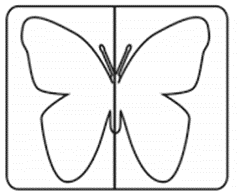
    ➤ Flowers, butterflies, spider webs, temples, mosques, palaces.

  • Why is symmetry important in art and design?
    ➤ It adds balance, beauty, and harmony.

Explore – Outdoor & Interactive Learning:

  • Nature Walk: Identify leaves, flowers, or insects with symmetry (e.g., starfish, butterflies).

  • Museum/Temple Visit: Observe symmetrical architecture and patterns.

  • Symmetry Puzzle Corner: Tangrams, mirror drawings, folding symmetry paper challenges.

Reflection Questions:

  • How does creating patterns help you understand math better?

  • Can you name real-world objects that have rotational or reflection symmetry?

  • Why do you think ancient architecture used symmetry?

Wrap-Up Message:

Symmetry and geometry go beyond math books. They help us appreciate the design of nature and human creations. Through drawing, observation, and active exploration, students don’t just learn — they experience mathematics.

Let’s continue to embrace the beauty of symmetry as we design, explore, and discover more!

Class 6 NCERT bridge course Answers Activity W3.4 Creating Patterns and Designs with Rotational and Reflection Symmetry

 Creating patterns and designs with rotational and reflection symmetry 

◻Symmetry is a property where one shape or arrangement can be transformed into another that looks the same. 

Activity W3.4  Creating Patterns and Designs with Rotational and Reflection Symmetry

 ● Provide students with various shapes such as squares, triangles, and stars etc. 

 Ask them to rotate each shape and observe if it looks the same after a certain amount of rotation.

 Encourage them to identify the amount of rotation to get a similar shape.


Activity W3.4: Creating Patterns and Designs with Rotational and Reflection Symmetry

Objective:

To help students understand rotational and reflection symmetry by using basic geometric shapes and observing how they behave when rotated or reflected.

What Is Symmetry?

Symmetry is when a shape or design looks the same after a transformation like flipping (reflection) or turning (rotation).

  • Rotational Symmetry means a shape looks the same after being rotated (turned) by a certain angle.

  • Reflection Symmetry (also called line symmetry) means one half of the shape is a mirror image of the other.

Materials Needed:

  • Cut-outs of basic shapes: squares, equilateral triangles, rectangles, stars, circles

  • A protractor (optional)

  • Mirror strips (optional for reflection symmetry)

  • Chart paper or plain grid sheets

  • Colored pencils/markers

Part 1: Exploring Rotational Symmetry

 Instructions:

  1. Give each student a shape cut-out.

  2. Ask them to rotate the shape by 90°, 180°, 270°, and 360°.

  3. At each step, check if the shape looks the same.

  4. Record the angles where the shape matches its original position.

Example:

  • Square:
    Rotational symmetry at 90°, 180°, 270°, and 360°
    → It has rotational symmetry of order 4.


  • Equilateral Triangle:
    Rotational symmetry at 120°, 240°, 360°
    → Order 3.


  • Star (5-pointed):
    Rotational symmetry every 72° (360° ÷ 5)
    → Order 5.


Part 2: Exploring Reflection Symmetry

Instructions:

  1. Fold the shape in half in different directions.

  2. If both halves match, then the shape has reflection symmetry along that fold.

  3. Mark all possible lines of symmetry.

Example:

  • Rectangle: 2 lines of symmetry (vertical and horizontal) 


  • Square: 4 lines of symmetry


  • Circle: Infinite lines of symmetry


  • Heart: 1 vertical line of symmetry


Extension: Creating Symmetry-Based Designs

  1. Use rotation and reflection to create rangoli-like patterns.

  2. Repeat triangles or stars around a center point to form a mandala.

  3. Fold and cut papers to make snowflake patterns using symmetry.

Shapes Set Geometric Shapes


Discussion Questions:

  • Which shapes have the most lines of symmetry?

  • Does every shape have rotational symmetry?

  • Can a shape have rotational symmetry but no reflection symmetry?

Conclusion:

By experimenting with common shapes, students develop a visual understanding of both reflection and rotational symmetry. These foundational geometry skills help in art, math, and logical reasoning.

Class 6 NCERT bridge course Answers Activity W3.3 A Treasure Hunt

 Activity W3.3 A Treasure Hunt

A Treasure Hunt Provide each student with a copy of the treasure map, 

which includes coordinates (i.e., pairs of numbers discussed in earlier activity) 

marking the location of the treasure. 

 Explain the objective of the activity:

 to use the given coordinates to locate the treasure.

 Allow students to work individually or in pairs to navigate the map and find the treasure.

Once the treasure is found, celebrate the successful completion of the hunt and discuss the coordinates used to locate the treasure. 

 Encourage students to create their own treasure maps for future activities, incorporating coordinates and landmarks of their choice


Let's imagine this map uses a simple grid system 
The bottom left 
The top right-) 
Starting point where the pirate boy is A (15,4) 
Pirate ship B (7,3) 
Skull Rock C(6,7) 
Crocodile pond D (3,8) 
Light house E (11.I0) 
Dragon cave F(13,8) 
X Marks the Treasure G(13,5)


Activity W3.3: A Treasure Hunt Using Coordinates

Objective:

To reinforce the concept of coordinates by having students locate "hidden treasures" on a grid-based map using ordered pairs (x, y). This activity enhances spatial reasoning, logical thinking, and basic map-reading skills.

Materials Needed:

  • A Treasure Map (printed or drawn grid map with landmarks and labeled axes)

  • Clue cards with coordinates (e.g., (3, 5), (7, 2))

  • Pencil and colored markers

  • Small tokens or stickers to mark the treasure

  • Optional: Geo boards or tactile grids for visually challenged students

 How It Works:

  1. Provide the Treasure Map:
    Each student or pair gets a printed map grid, e.g., a 10x10 grid. The x-axis (horizontal) and y-axis (vertical) should be labeled from 1 to 10.

  2. Mark Landmarks for Storytelling (Optional):
    Include fun icons like a palm tree at (4, 2), a ship at (1, 9), a cave at (8, 3), a skull rock at (6, 6), and the treasure chest at (5, 7).

  3. Explain the Coordinates:
    Review that each coordinate tells:

    • How far to go right (x)

    • How far to go up (y)

  4. Start the Hunt:
    Distribute clue cards or call out clues like:

    • “Go to (3, 4) to find the old lighthouse.”

    • “Then head to (5, 7) to discover the buried treasure.”

  5. Finding the Treasure:
    When students reach the treasure coordinate, they mark it and celebrate!

 Example:


Treasure Map Coordinates Clue List:

  • (2, 1): "Start here at the Dock"

  • (4, 2): "Visit the Palm Tree"

  • (6, 6): "Avoid the Skull Rock"

  • (5, 7): "YOU FOUND THE TREASURE!"

 Encourage Students To:

  • Create their own maps with different landmarks and hidden treasure spots.

  • Write short stories or clues leading to their hidden treasure using coordinates.

  • Trade maps with friends and solve each other’s treasure hunts!

 Learning Outcomes:

  • Understand and apply the concept of coordinates (x, y).

  • Improve directionality and navigation skills.

  • Foster creativity and collaborative learning.


WORKSHEET ch1 class 6

WORKSHEET - Number pattern 1)  1,3,5,7, ________, ___________,  _______ Rule- ________________ 2)  2,4,6,8,________, ___________,  _______ R...