Activity W3.2
Ask the students to take a piece of paper that looks like a big checkerboard,
with lots of little squares on it.
Each of these squares has its own special address, i.e., giving each square a name so that we can find it easily.
Give the students two numbers, say (3, 4), to tell us where a square is.
The first number tells us how far to move to the right.
The second number tells us how far to move up or down.
Give plenty of such numbers and ask them to plot these on the grid.
This gives them an intuitive idea of the coordinate system.
Students may try plotting some points on our own grid!
It's like connecting the dots to reveal a hidden picture.
(Please provide such graphics for connecting dots as hands on activity)
Plastic mesh grid or geo board may be used for students with visual challenges.

Activity W3.2: Exploring Coordinates on a Checkerboard Grid
Objective:
Help students understand the concept of coordinates as addresses on a grid, by plotting points given as ordered pairs (x, y).
Procedure:
-
Introduce the Checkerboard Grid:
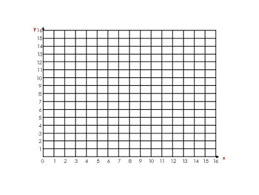
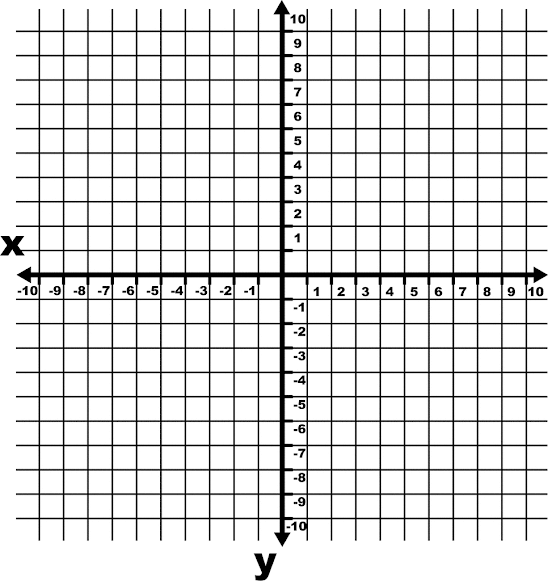
Provide students with a sheet of paper printed with a big checkerboard or grid made up of small squares (for example, a 10x10 grid). -
Explain the Coordinates:
Each square on the grid has a special address or coordinate, written as a pair of numbers (x, y).-
The first number (x) tells how many squares to move to the right starting from the origin (bottom-left corner).
-
The second number (y) tells how many squares to move up from the origin.
-
-
Plotting Points:
Give students coordinate pairs such as (3, 4), (1, 7), (5, 2), etc.
Ask them to find the corresponding squares on the grid and mark those points with a dot or sticker. -
Connect the Dots:
Once all the points are plotted, students connect the dots in the order given to reveal a hidden shape or pattern. This can be a simple shape like a house, a star, or a letter. -
Encourage Creativity:
Invite students to create their own sets of coordinates and swap with classmates to plot and reveal new pictures.
Example Coordinates to Plot (for a simple house shape):
| Point | Coordinates (x, y) |
|---|---|
| A | (2, 2) |
| B | (2, 5) |
| C | (4, 7) |
| D | (6, 5) |
| E | (6, 2) |
| F | (2, 2) |
Additional Notes:
-
For students with visual challenges, use a plastic mesh grid or geoboard with tactile strings or rubber bands to feel the shape.
-
Encourage using colorful markers or stickers for points and lines.
-
To visualize the coordinate system better, label the x-axis and y-axis clearly on the grid.
-
A large grid (10x10 squares) labeled with numbers along the bottom (x-axis) and side (y-axis).

-
Points plotted at example coordinates.

-
Lines connecting points to form a simple recognizable shape (e.g., house).

-
A blank grid for students to try their own plotting.
No comments:
Post a Comment